Discord Bot Pipeline - Creating The Bot
This post is part 9 of a 10 part series:
- Part 1 - Discord Bot Pipeline - Intro
- Part 2 - Discord Bot Pipeline - GCP Setup
- Part 3 - Discord Bot Pipeline - GitHub Setup
- Part 4 - Discord Bot Pipeline - Terraform Setup
- Part 5 - Discord Bot Pipeline - GitHub Actions Setup
- Part 6 - Discord Bot Pipeline - Making Terraform Changes
- Part 7 - Discord Bot Pipeline - Discord Specific Terraform Setup
- Part 8 - Discord Bot Pipeline - More Setup
- Part 9 - Discord Bot Pipeline - Creating The Bot (This Post)
- Part 10 - Discord Bot Pipeline - Conclusion
In this post, we’ll go over actually setting up the GitHub repo
Check out your discordbots GitHub repo to a local folder, make some
directories, and initialize a new go project:
git clone git@github.com:<your_user>/discordbots
cd <your_repo>

mkdir -p dalle/bot .github/workflows

cd dalle
go mod init github.com/<your_user>/discordbots/dalle
We could make the go project at the top level, but our deployment pipeline
using Cloud Build expects each bot to be its own go project, so if you create
another bot, you will need to run go mod init again in the new bot’s folder.
Let’s create (yet more) infrastructure, starting with a simple GitHub workflow. Although Cloud Build will also run build and test, we want some quick checks before we merge a PR before kicking off any of our GCP infrastructure.
Create .github/workflows/build_and_test.yaml and populate it with:
name: Build and Test

on:
  push:
    branches:
      - main
  pull_request:

jobs:
  # Can use a build matrix here, finding all go.mod files and iterating.
  build_and_test:
    runs-on: ubuntu-latest
    steps:
      - uses: actions/checkout@v3
      - uses: actions/setup-go@v4
        with:
          go-version: "^1.20.5"
      - run: cd dalle && go build ./...
      - run: cd dalle && go fmt ./...
      - run: cd dalle && go test ./...
Right now this just runs go build, go fmt, and go test for the dalle bot.
For subsequent bots, you may want to instead write this workflow to find
go.mod files and use a GitHub build matrix to run the go commands
for all of your bots.
Now let’s create cloudbuild.yaml, which governs how GCP’s Cloud Build behaves
when triggered by new commits to the repo:
steps:
  # Run tests and save to file
  - name: golang:1.20
    entrypoint: /bin/bash
    args:
      - -c
      - |
        cd "${_APP}"
        go install github.com/jstemmer/go-junit-report/v2@latest
        2>&1 go test -timeout 1m -v ./... | /go/bin/go-junit-report -set-exit-code -iocopy -out ${_APP}_${SHORT_SHA}_test_log.xml

  # Docker Build
  - name: "gcr.io/cloud-builders/docker"
    args:
      [
        "build",
        "--build-arg",
        "FOLDER=${_APP}",
        "--build-arg",
        "VERSION=${SHORT_SHA}",
        "-t",
        "${_ZONE}-docker.pkg.dev/$PROJECT_ID/services/${_APP}:${SHORT_SHA}",
        ".",
      ]

  # Docker push to Google Artifact Registry
  - name: "gcr.io/cloud-builders/docker"
    args:
      [
        "push",
        "${_ZONE}-docker.pkg.dev/$PROJECT_ID/services/${_APP}:${SHORT_SHA}",
      ]

  # Deploy to Cloud Run
  - name: "gcr.io/cloud-builders/gcloud"
    entrypoint: "bash"
    args:
      - "-c"
      - |
        gcloud run deploy "${_APP}" \
          --image="${_ZONE}-docker.pkg.dev/${PROJECT_ID}/services/${_APP}:${SHORT_SHA}" \
          --region=${_ZONE} --platform="managed"

# Save test logs to Google Cloud Storage
artifacts:
  objects:
    location: gs://${PROJECT_ID}_cloudbuild/logs
    paths:
      - ${_APP}/${_APP}_${SHORT_SHA}_test_log.xml
This configures Cloud Build to run some basic build steps, including the entire Docker build, tag, and push steps. We additionally save logs to GCS in case of failure. Notice the variables used in this config:
_APP- this is injected from Terraform. Recall that thegoogle_cloudbuild_triggerresource included asubstitutionblock, where_APPwas defined to be the name of the bot. Thus, there is a direct relationship between the name of the folder and the name of the bot in Terraform (they must match)._ZONE- this is a GCP zone also injected from Terraform like_APP.SHORT_SHA- this is a predefined variable corresponding to the 7 character git commit sha, which is used both for the Docker image’s tag and will also be injected into the bot for versioning purposes.
Note that the config performs a docker build step at the top level of the
project, meaning we also need a Dockerfile, so go ahead and create one with
the following contents:
FROM golang:1.20-buster as builder
WORKDIR /app

# These args will be automatically injected by Cloud Build based on
# cloudbuild.yaml.
# Args:
#   FOLDER: The folder containing the bot's source code, i.e. 'dalle'.
#   VERSION: The version of the bot, from git.
ARG FOLDER
ARG VERSION

RUN apt-get update -y && apt-get install -y git

# Perform this build in two stages. First copy go.{mod,sum} and run
# go mod download to fetch dependencies. Separating these phases
# allows this step to be cached as a docker layer.
COPY ${FOLDER}/go.* ./
RUN go mod download

# Build the server, using the VERSION build arg to set the bot's version.
COPY ${FOLDER} ./
RUN go build \
  -ldflags "-X github.com/thompsonja/discord_bots_lib/pkg/version.Version=${VERSION}" \
  -v -o server

# Use a multi stage build using the debian slim image.
FROM debian:buster-slim
RUN apt-get update -y \
  && DEBIAN_FRONTEND=noninteractive apt-get install -y ca-certificates \
  && rm -rf /var/lib/apt/lists/*

# Copy the server binary to the slim image
COPY --from=builder /app/server /server

CMD ["/server"]
This is a relatively straightforward Dockerfile, simply running go build in
the appropriate bot’s folder, injecting the git commit sha as a version as
described earlier.
Now let’s get to the go code! Create a file dalle/bot/bot.go. I’ll break this
file down into individual components but the final repository can be found in
GitHub.
First some basic imports:
package bot

import (
	"bytes"
	"context"
	"encoding/base64"
	"encoding/json"
	"fmt"
	"net/http"
	"strings"
	"time"

	"github.com/bwmarrin/discordgo"
	"github.com/thompsonja/discord_bots_lib/pkg/discord/webhooks"
	"github.com/thompsonja/discord_bots_lib/pkg/gcp/secrets"
	"github.com/thompsonja/discord_bots_lib/pkg/version"
	"github.com/thompsonja/openai-go/pkg/client"
	"github.com/thompsonja/openai-go/pkg/image"
)
We’re using a few libraries I’ve written in the past to interact with both the OpenAI API as well as Discord webhooks. The following code defines a Bot struct that will respond to Discord commands:
// Define the structure of our Dalle bot
type Bot struct {
	gcpProjectID    string
	apiKeyGCPSecret string
	openaiClient    *client.Client
}
Here we define a list of supported commands. Discord commands support arguments, but most of our commands are relatively straightforward:
- debug - Returns an error. We will use this to test that email alerts work
- version - Prints version information (the git commit sha)
- generate - Generates a single large image from an input prompt
var (
	Commands = []*discordgo.ApplicationCommand{
		{
			Name:        "debug",
			Description: "Debugging command that returns an error",
		},
		{
			Name:        "version",
			Description: "Get the version information for this bot",
		},
		{
			Name:        "generate",
			Description: "Creates a single large image given a prompt",
			Options: []*discordgo.ApplicationCommandOption{
				{
					Name:        "image-prompt",
					Description: "Text prompt to pass to Dall-e 2",
					Type:        discordgo.ApplicationCommandOptionString,
					Required:    true,
				},
			},
		},
	}
)
Now for some initialization code:
func New(gcpProjectID, openaiApiSecret string) *Bot {
	return &Bot{
		gcpProjectID:    gcpProjectID,
		apiKeyGCPSecret: openaiApiSecret,
	}
}

func (b *Bot) initOpenAIClient() error {
	if b.openaiClient != nil {
		return nil
	}

	apiKey, err := secrets.GetLatestSecretValue(b.apiKeyGCPSecret, b.gcpProjectID)
	if err != nil {
		return fmt.Errorf("initOpenAIClient: %v", err)
	}
	b.openaiClient = client.New(strings.TrimSpace(apiKey))
	return nil
}
Of note here is initOpenAIClient, which fetches your OpenAI API key from GCP
Secret Manager. Note that it doesn’t run as part of bot initialization. This is
because Discord bots have a three second window to respond to a Discord ack
message. So we defer any logic that may take time until after we perform this
initial ack.
Let’s take a look at individual commands. First the Debug command:
// Debug returns an error to test email notifications
func (b *Bot) Debug(c *webhooks.Client, i *discordgo.Interaction, r *http.Request) error {
	c.SendStringResponse(i, "Returned an error")
	return fmt.Errorf("an example error")
}
This command is straightforward. It uses a webhook client library to send a message back to the Discord server and returns an error. This is useful for generating errors to ensure that our email notifications work properly. Once we verify this we can delete this command.
Next up is the Version command:
// Version returns the git commit sha of the bot
func (b *Bot) Version(c *webhooks.Client, i *discordgo.Interaction, r *http.Request) error {
	version := fmt.Sprintf("Dall-e Bot Version: %s", version.Version)
	return c.SendStringResponse(i, version)
}
Again this is straightforward. The version is a string that is injected by the build process as described earlier.
Now finally the most important command, Generate:
// Generate creates a single large image given a prompt
func (b *Bot) Generate(c *webhooks.Client, i *discordgo.Interaction, r *http.Request) error {
	imagePrompt := i.ApplicationCommandData().Options[0].Value.(string)

	// Initialize the OpenAI client using your API key
	if err := b.initOpenAIClient(); err != nil {
		c.SendStringResponse(i, fmt.Sprintf("Failed to initialize OpenAI client: %v", err))
		return err
	}

	// Send the prompt to the OpenAI API
	data, err := b.openaiClient.Image.Create(context.Background(), &image.CreateRequest{
		Prompt: imagePrompt,
		Size:   "large",
		N:      1,
	})
	if err != nil {
		return c.SendStringResponse(i, fmt.Sprintf("Failed to create image: %v", err))
	}

	// Conver the byte data response to pngs
	pngs, err := b.createPngs(data)
	if err != nil {
		c.SendStringResponse(i, fmt.Sprintf("Failed to create png files: %v", err))
		return err
	}

	// Create Discord file ob2023-07-05-discord-bots-part-10-deployjects and send them as a response
	files := []*discordgo.File{}
	now := time.Now().Format("20060102_150405")
	for idx, png := range pngs {
		files = append(files, &discordgo.File{
			Name:        fmt.Sprintf("%s_%d.png", now, idx),
			ContentType: "image/png",
			Reader:      bytes.NewBuffer(png),
		})
	}
	return c.SendFilesResponse(i, files)
}
One thing to note here is how we use the error return value. note that we really have two different communication channels we care about, communication with the user who is calling the bot, and you, the owner and maintainer of the bot. Any error returned by this function will trigger an email notification, so we need to understand who the intended recipient of the error message is.
For example, the call to the OpenAI API can fail due to the prompt being something that the API rejects. This should be returned to the user and not alert you. However, a failure to convert the byte data to a png is a bot error that should result in an alert. Either way, failures should at least send a message back to the channel so that the user knows the request will never succeed.
Finally, here’s some helper code used by the Generate function to convert byte
data to png data:
type dalleDataResponse struct {
	URL      string `json:"ur2023-07-05-discord-bots-part-10-deployl,omitempty"`
	B64_json string `json:"b64_json,omitempty"`
}

type dalleResponse struct {
	Created int                  `json:"created,omitempty"`
	Data    []*dalleDataResponse `json:"data,omitempty"`
}

func (b *Bot) createPngs(data []byte) ([][]byte, error) {
	var d dalleResponse
	if err := json.Unmarshal(data, &d); err != nil {
		return nil, fmt.Errorf("json.Unmarshal: %v", err)
	}

	ret := [][]byte{}
	for _, dataResponse := range d.Data {
		pngData, err := base64.StdEncoding.DecodeString(dataResponse.B64_json)
		if err != nil {
			return nil, fmt.Errorf("base64.StdEncoding.DecodeString: %v", err)
		}
		ret = append(ret, pngData)
	}

	return ret, nil
}
Now that the bot code is written, let’s write our main package in
dalle/main.go, starting with our basic imports:
package main

import (
	"crypto/ed25519"
	"encoding/hex"
	"flag"
	"log"
	"os/exec"
	"strings"

	"cloud.google.com/go/logging"
	"github.com/thompsonja/discord_bots_lib/pkg/discord/webhooks"
	"github.com/thompsonja/discord_bots_lib/pkg/gcp/logger"
	"github.com/<your_user>/discordbots/dalle/bot"
)
We need to declare our app ID and public key, which can be retrieved from the Discord application page, and then decode them to an ed25519 key that is passed to the discordgo library:
// Replace appID and publicKey with your bot's values
const (
	appID     = "<your app's ID>"
	publicKey = "<your app's public key>"
)

var (
	pk, _ = hex.DecodeString(publicKey)
	epk   = ed25519.PublicKey(pk)
)
Finally, let’s build our main function:
func main() {
	var gcpProjectID = flag.String("project_id", "", "GCP Project ID")
	var port = flag.Int("port", 8080, "server port")
	var updateCommands = flag.Bool("update", false, "Update commands")
	var destroyCommands = flag.Bool("destroy", false, "Destroy commands")
	var openaiApiSecret = flag.String("openai_api_secret", "openai-api-secret", "GCP secret with openai-api key")

	flag.Parse()

	// Get project ID from your gcloud config if not passed in as a flag.
	if *gcpProjectID == "" {
		cmd := exec.Command("gcloud", "config", "get-value", "project")
		stdoutStderr, err := cmd.CombinedOutput()
		if err != nil {
			log.Fatalf("cmd.CombinedOutput: %v", err)
		}
		*gcpProjectID = strings.TrimSpace(string(stdoutStderr))
	}

	// Instantiate a bot.
	b := bot.New(*gcpProjectID, *openaiApiSecret)

	// Map Discord Application Commands to bot functions.
	fns := map[string]webhooks.WebhookFunc{
		"debug":    b.Debug,
		"version":  b.Version,
		"generate": b.Generate,
	}

	// Create a GCP logging client
	client, err := logging.NewClient(context.Background(), *gcpProjectID)
	if err != nil {
		log.Fatalf("Failed to create client: %v", err)
	}
	defer client.Close()

	// Create a new webhook client.
	// SecretKey is the name of the GCP Secret that was automatically created by
	// the terraform configs and manually populated.
	c, err := webhooks.NewClient(webhooks.ClientConfig{
		AppID:     appID,
		Commands:  bot.Commands,
		Port:      *port,
		Epk:       epk,
		Fns:       fns,
		ProjectID: *gcpProjectID,
		SecretKey: "dalle-key",
		Logger:    logger.New(client, "dalle-logs"),
	})
	if err != nil {
		log.Fatalf("discord.NewClient: %v", err)
	}

	// Run the bot, destroying and updating commands if desired.
	if err := c.Run(*destroyCommands, *updateCommands); err != nil {
		log.Fatalf("c.Run: %v", err)
	}
}
Note that we create a GCP cloud logger with log name dalle-logs. This matches
the Terraform configurations for our log based metrics and alerts.
A few command line flags have been added for convenience. When you create a Discord bot, especially one that responds to webhooks, you need to communicate with the Discord APIs in order for them to be visible. This is because a persistent bot can advertise what functions it supports, but one triggered via webhook is only started when a command is sent. Therefore we need to tell Discord ahead of time what commands it supports.
If you’re currently logged in to the correct GCP account (run gcloud auth list
and gcloud config list to verify your account and GCP project), then you can
simply build and run the go binary as follows:
cd dalle
go mod tidy
go build .
./dalle --update
You’ll see some output like:
2023/07/08 16:29:07 Adding commands...
2023/07/08 16:29:08 Creating command  (name debug) for app ID 1096915795826712636
2023/07/08 16:29:08 Creating command  (name version) for app ID 1096915795826712636
2023/07/08 16:29:08 Creating command  (name generate) for app ID 1096915795826712636
2023/07/08 16:29:08 Done
2023/07/08 16:29:08 Starting server at port 8080
Note that this will also run the server, which you can later use for debugging
purposes. Go ahead and stop the server (ctrl-c). You can also delete the
generated dalle binary (aka ./dalle/dalle).
Let’s now go ahead and commit your changes to your discordbots repository. By
doing so, it should correctly trigger a GCP Cloud Build build. Let’s see it in
action!
# From the project root
git add .
git commit -m "Initial dalle bot"
git checkout -b "dalle-bot"
git push
By now you should get the idea. Create a Pull Request in GitHub and verify that the GitHub workflow passed successfully. Note that since this is a new workflow, it won’t block you from merging your PR. Manually verify them instead and then merge, setting up your branch protection rules later.
Merging the PR will trigger a new Cloud Build on GCP. Let’s take a look by navigating to Cloud Build.
You should see something like:
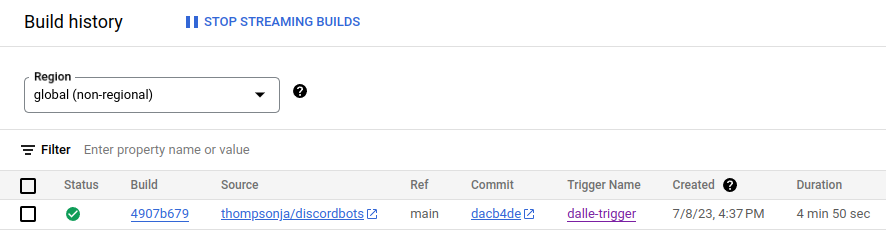
It should show a successful build! Note the commit sha, in this case dacb4de.
Now let’s see if Cloud Run also successfully updated to use the new build image.
Navigate to Cloud Run and select the
dalle service and navigate to the Revisions tab. This section shows Cloud
Run history. Every time you update the dalle code in your repository and merge
it, you should eventually see a new entry here, as shown below:
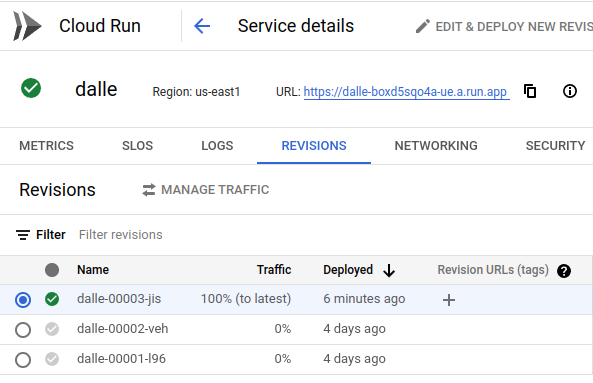
Note that you can also see a URL (at the top of the above picture) when you are viewing a Cloud Run service. This is the exposed URL that you can now provide to Discord in order to connect it as a webhook.
In the General Information tab in the Discord developer portal for your bot,
scroll down to the input box Interactions Endpoint URL and paste the URL from
Cloud Run into it:
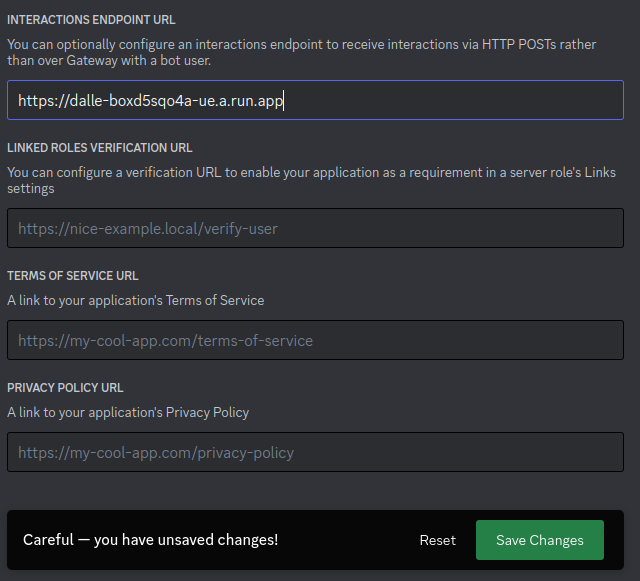
Click save, and you should get a confirmation that it worked:

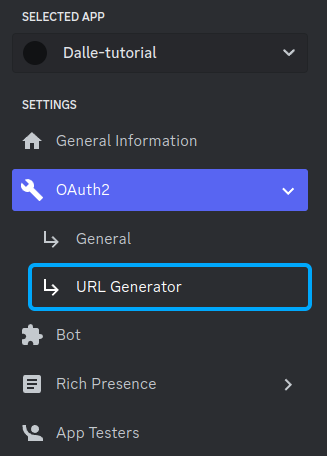
While you’re here, go ahead and create the Discord invite link.
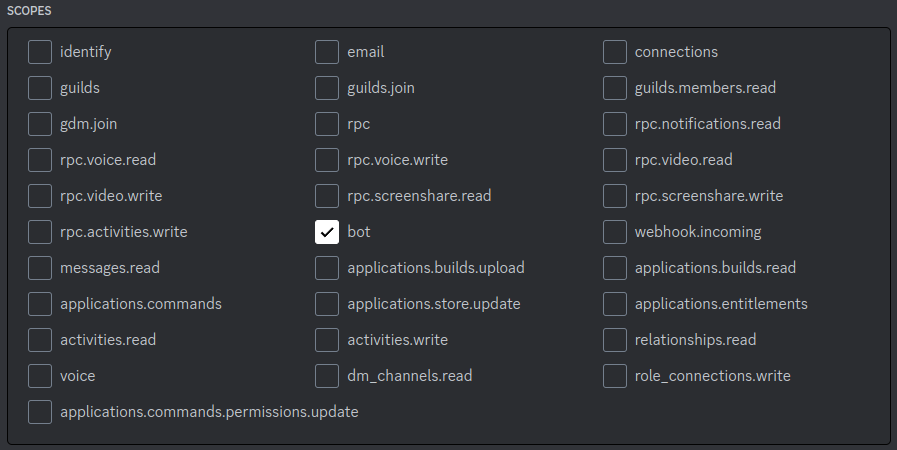
Navigate to the URL Generator page, select bot scope, and give the following
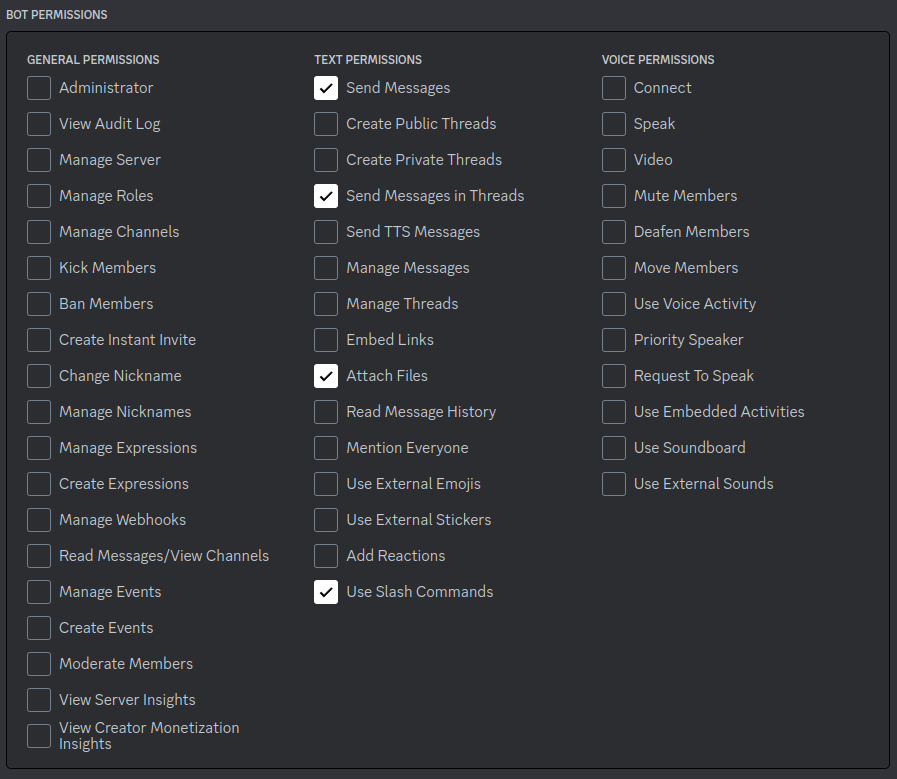
permissions:
- Send Messages
- Send Messages in Threads
- Attach Files
- Use Slash Commands
As shown below:
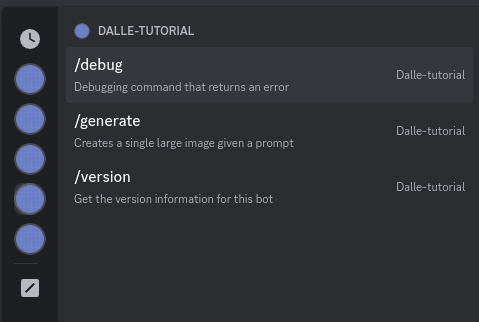
Copy the link and paste it into your browser. Select the server you want to add your bot too (I usually have a test server for these purposes). Once added, let’s try it out. Type a slash to bring up the slash commands menu, where you should see your bot and its available commands:
Give the /version command a try:

Notice that the version matches the git commit sha from earlier! This is useful for debugging if you want to verify that the bot is the version you think it is.
Finally let’s verify the actual image generation command. Type /generate and
enter a prompt, as shown below (edited for brevity):